
In my previous blog, I guided you through the initial steps of setting up Compliance Manager and using the NIS2 in Compliance Manager. We covered key points as setting up the NIS2 regulation in an assessment in Microsoft Compliance Manager and also discussed how to take action based on the assessment outcomes.
In this follow-up blog, we will focus on the technical side of NIS2 implementation, and also with the use of Priva Privacy Risk Management. Additionally, I will show you how to use Compliance Manager to generate useful exports in Excel and detailed reports for easier monitoring and compliance tracking.
Previously, we discussed an operational implementation. Now, let’s take a closer look at a technical implementation. In this case, we’ll focus on the action Create data transfer policies to support privacy goals.
When we click on this action, we’re taken to its detailed page, which again includes the Details, Evidence, and Related Controls tabs. Let’s zoom in on the foundation of this action under the Related Controls tab:
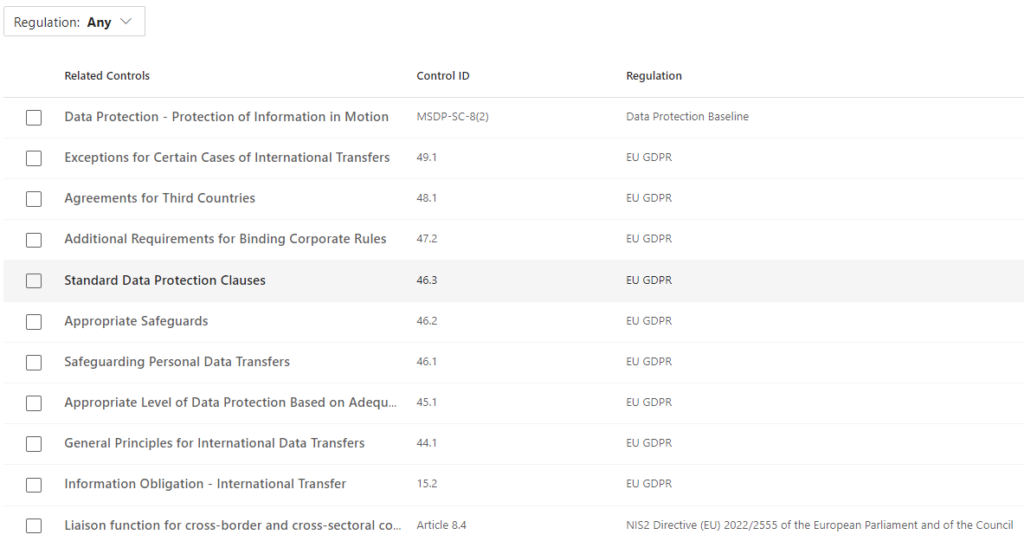
Here, you’ll see that multiple controls are applicable from different regulations. For instance, because my tenant also has the EU GDPR regulation enabled in another assessment, you’ll notice articles referenced from both the EU GDPR and NIS2. It’s good to know that a single action can address requirements from multiple regulations or sections within a regulation, as the interpretation might serve overlapping goals.
Let’s go back to the Details of this action.

Here, it explains that Priva Privacy Risk Management can be used to prevent personal data from being shared within your organization, such as in Teams or OneDrive. This aligns with the purpose of the action related to the NIS2: to create data transfer policies supporting privacy goals. While you’re not bound to Microsoft Priva as a solution, because you might have alternative tools in place, we will use Priva for this example. I’ll use Priva to create a new Privacy Risk Management policy. Let's go to the Microsoft Priva portal.
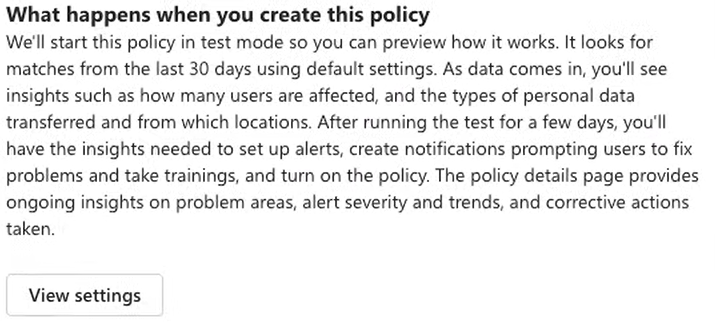
When creating a new policy in Priva, you’ll find several templates to choose from, such as Data Transfers and Data Minimization. In this case, since we want to prevent data from being overly exposed, we’ll select the Data overexposure template.

As you’ll notice, the policy is initially set up in test mode, which I always recommend. This allows you to monitor what types of data are being exchanged without immediately affecting the user experience. Click View settings to change the settings of this default policy. You can also adjust the policy name if needed.
Set up the policy with the necessary settings, then monitor its impact on your tenant over the course of a few days or weeks. In a future blog, I’ll dive deeper into generating reports, monitoring, and enforcing the results using Priva Privacy Risk Management. For now, understand that implementing Privacy Risk Management can help to fulfill this requirement of the NIS2 regulation.
Having completed this technical implementation, we can now update the action in Compliance Manager, perform the test and verification, and upload evidence to demonstrate that we’ve implemented Priva Privacy Risk Management. This marks another step toward completing the entire assessment.
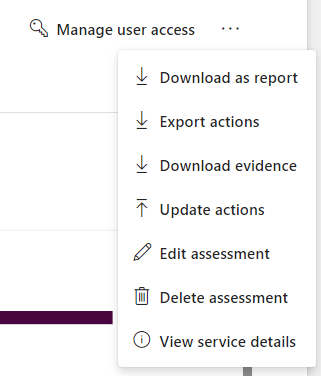
One of the great features of Compliance Manager is the ability to easily export actions or generate reports on completed actions. This is particularly useful for audits, where you might want a clear overview of the status of all actions without clicking into each individual item in the portal. Additionally, it allows you to provide the required documentation in one go. You can even download all uploaded evidence in one step, making it much easier to share information during an audit.
You’ll find these export options in the Assessment Overview dropdown in the top-right corner.
An Excel export provides a great overview of all actions, those that have been completed and those still pending.

What’s even a bonus is that you can use this Excel file to update multiple items at once. Once the updated file is uploaded back into Compliance Manager, the information will automatically sync with the corresponding items. This comes in handy if you’re managing multiple actions or find Excel easier to work with.
Choosing the report option will generate a summary of the controls implemented within your Microsoft 365 environment. This report highlights all controls and organizes them by those derived from the NIS2 regulation.
While this report can demonstrate your Microsoft 365 compliance efforts, it won’t cover organization-wide measures. However, it can provide a solid foundation for showcasing what has been done within your tenant and serve as a starting point for organizational compliance.

With Compliance Manager, you can manage various regulations, including NIS2. The NIS2 is already available as a Premium template within Compliance Manager, making it easy to get started. In addition to the measures Microsoft already takes, you can quickly work on the actions relevant to your organization, both organizational and technical.
Compliance Manager can serve as a tool for a Security Officer to demonstrate the measures implemented within the tenant. However, it will not cover all the organizational actions required for full compliance with NIS2. It provides an excellent starting point for any technical configuration and includes tools to easily share information during an audit.

Hi, I'm Ziggy Itjoejaree. I work as Modern Workplace Engineer and have a big interest in Microsoft Purview, Data, AI and compliancy. In my daily job, I am mostly helping customers transform and migrate to a Cloud work environment.